Introduction Start here
Migro is a WordPress plugin that changes how you move content between environments. Instead of migrating entire sites and risking data loss on the live site, Migro lets you select and migrate specific posts, pages, media, and all their metadata, leaving everything else on the destination untouched.
Hybrid architecture
Migro uses a hybrid approach: it reads target environment data through a secure database connection while authenticating operations natively via the WordPress REST API and Application Passwords.
Installation
Download the Plugin
Download the free version directly from the WordPress plugin repository, or use your Migro Pro ZIP file from your license email.
Install on both sites
Migro needs to be active on both environments: your staging site and your production site. Install and activate it on each one.
Activate
Go to WordPress Admin → Plugins → Add New → Upload Plugin. Install and activate. The Migro menu will appear under Tools → Content Migration.
Requirements
- WordPress: 5.6 or higher (required for native Application Passwords)
- PHP: 7.4 or higher
- cURL: Your source site must support cURL to send requests
- Database access: You need the database credentials of your remote environment
Setup Wizard Automatic Onboarding
Migro includes a guided Setup Wizard that launches automatically on first activation. It walks you through choosing your environment role and connecting to your paired site in a few steps.
Welcome & Environment Selection
The wizard introduces you to the Migro staging/production model and prompts you to select the role of the active site: Staging Environment or Production Environment.
License Key Activation (Pro)
Enter and validate your Pro license key. Free users can skip this step.
Remote Connection Credentials
Prompts for your paired site's URL, remote MySQL Database credentials (host, name, user, password), and remote WordPress REST API Application credentials.
Remote Verification
Before saving, the wizard tests the database connection, checks that the remote URL is reachable, and confirms Migro is active on the target site. Any problems are flagged with a clear message before anything is saved.
Ready to Roll
Once all checks pass, the paired relationship is locked and secured, and you are redirected directly to the Migration dashboard to load content.

Already configured?
If you need to re-run the Setup Wizard at any time to reconfigure the environment role or rebuild connection parameters, you can launch it directly from Tools → Content Migration → Settings → Reset, or by navigating to admin.php?page=migro-content-migrator-setup.
Generating Application Passwords
To securely transport content, Migro requires an Application Password on the target site (e.g., production).
- Log in to your remote target site directly.
- Go to Users → Profile (or edit your admin user).
- Scroll down to the Application Passwords section.
- In the "New Application Password Name" field, type something like
Migro Staging. - Click Add New Application Password.
Save your password immediately
WordPress shows the generated password (e.g. xxxx xxxx xxxx xxxx xxxx xxxx) only once. Copy and store it before closing the screen.
Configuring Connections
On your local/staging site, go to Tools → Content Migration → Connection tab and fill in:
- Site URL: Full URL of your remote site (e.g.
https://production.com) - Database Host: Usually
localhost,127.0.0.1, or a host provided by your hosting provider - Database Name: The remote site's database name
- Database Username / Password: Database credentials (not your WordPress login)
- API Username: Your WordPress admin username on the remote site
- Application Password: The 24-character password generated in the previous step
Click Test Connection. Once verified, the connection is saved automatically for future use.
Local by WP Engine + Production Server
A common workflow is running your staging environment in Local by WP Engine and pushing content to a live production server. Migro supports this directly.
Install Migro on both sites
Install and activate Migro on your Local site and on your production server.
Create an Application Password on production
Log into your live production site, go to Users → Profile → Application Passwords, and generate a password for Migro. Save it immediately. It is only shown once.
Get your production database credentials
Your hosting provider's control panel (cPanel, Kinsta, WP Engine, Cloudways, etc.) has your database host, name, and credentials. The host is usually localhost or a hostname like mysql.yourhost.com.
Configure the connection in Local
On your Local site, go to Migro → Settings → Connection and enter your production server's Site URL, database credentials, and Application Password. Click Test Connection to verify.
Local MySQL socket
Local by WP Engine uses a MySQL socket instead of a standard host. If another site needs to connect to your Local site (pulling from Local instead of pushing to it), paste the socket path from the Database tab in the Local app into the Database Host field. It looks like:
/Users/username/Library/Application Support/Local/run/xyz/mysql/mysqld.sockMigrating Content
Once the Setup Wizard locks in your paired connection, you don't pick a connection per migration; the plugin already knows which environment this site is paired with. Day-to-day migration happens on the Batch Migration tab (the first tab on the Migro screen).
The Batch Migration tab, top to bottom
The tab is a single guided form. Fill it out in order and click the action button at the bottom.
Pick a direction
Two side-by-side cards. On a staging site they read Production ↑ Staging — Send content to your Production site (push) and Production ↓ Staging — Pull content from your Production site (pull). Click whichever direction you want; the chosen card highlights and the rest of the form switches to show items from the source side.
Select content
Below Direction you'll see a scrollable list of items from the source environment with a Filter by type dropdown (All Types / Posts / Pages / Product / any registered CPT) and a Select All (N items) checkbox at the top. Each row shows the item title, a type badge, status, and date. A Viewing: Staging Content / Viewing: Production Content chip on the right confirms which side you're listing. Tick whichever items you want to migrate; the bottom of the list shows N items selected in real time.
Choose a conflict strategy
Two more cards: Overwrite existing content (replaces matching items on the destination when the source is authoritative) or Skip existing content (leaves matching items alone, only ships new ones). See Conflict Resolution for how Migro decides what counts as "the same item".
Review what every migration includes
A blue info panel below conflict resolution lists the bundled behaviors that always run on every migration: featured images, categories & tags, custom fields (ACF), and Yoast SEO metadata. There is nothing to tick here: it's a confirmation of what's about to ship along with the post body.
Decide on a pre-migration backup
The Create backup before migration checkbox is on by default. Migro will snapshot any destination item that's about to be overwritten so you can roll it back from the Backups tab. Leave it on unless you have a strong reason to skip. If a requested backup ever fails, the whole migration aborts safely before touching the destination.
(WooCommerce only) Delete orphan variations
If your selection includes variable products, the Delete orphan WooCommerce variations on the destination checkbox becomes relevant. Off by default. Turn it on only when the source side is the authoritative copy of the variation set, so variations you've deleted on the source also get cleared from the destination. See WooCommerce Migration for the full behavior.
Click the action button
The button label always reflects your direction choice: Push to Production on a staging site that picked push, Pull from Production on a staging site that picked pull, and the equivalents on a production site. Clicking it kicks off the Live Dashboard.
For single items, skip this tab entirely Pro
If you only want to migrate one or two items and you're on a Pro plan, you don't need to come to Batch Migration at all. Use Quick Migrate from the post list or the Gutenberg sidebar instead, shipping a single item with your default conflict strategy and backup setting in one click. On the free plan, Batch Migration is the way to migrate any item, including single ones.
Migro handles URL replacement, media deduplication, taxonomy term creation, and page-builder data automatically. You don't configure any of that per migration. Per-feature defaults not visible on the Batch Migration tab (alt text sync conflict mode, AI generation toggles, request timeout) live under Migro → Settings and the AI Enhancements tab.
Live Dashboard Real-Time UI
Clicking the action button on the Batch Migration tab swaps the form for a live dashboard that updates as each item finishes. Everything stays inside wp-admin, with no separate window or polling page.
Counters & progress bar
Four counters across the top (Successful, Skipped, Failed, Remaining) tick up as the batch runs. A progress bar underneath shows the percentage complete so you have an at-a-glance sense of how far along you are.
Live progress list
As each item finishes, it appears in the feed with a status badge (SUCCESS, SKIPPED, or FAILED) and color-coded row. A Hide Live Progress List toggle collapses the feed once a long-running migration gets noisy.
Migration Results panel
When the batch is done, a Migration Results panel groups items by outcome (Successful, Skipped, Failed) in collapsible sections. Each card shows the item title and a post-type badge (Post, Page, Product, your CPT) so you can see at a glance what shipped without scrolling through the full feed.
Retry failed items
Failed rows expose a Retry action so a one-off failure (a network blip, a rate limit, a transient remote 5xx) doesn't force you to rebuild the entire migration. Click Retry on the failed item and Migro re-runs just that one through the same engine.

Conflict Resolution
When Migro finds that an item already exists on the destination site, it uses the conflict resolution strategy you selected.
Migro identifies "the same item" by a sync key: a unique identifier stored in post meta that tracks an item across environments regardless of its post ID. This means renaming or moving a post does not break the connection between environments.
- Overwrite (Recommended): Replaces the existing item with the incoming version. All metadata and images are updated. Use this when you want the destination to match the source exactly.
- Skip: Leaves the existing item untouched. Use this when you want to deploy only new content.
Media & Attachment Migration
Migro automatically scans your content, featured images, and documents to safely transfer them to the destination site.
Smart Duplication Prevention
To keep your media library clean and prevent duplicate files, Migro uses smart file matching. Before downloading any image or file, it checks the destination site to see if an identical file already exists. If a match is found, Migro skips the upload and links your content to the existing file, saving you disk space and upload time.
How Media is Handled by Plan
- Free Plan: Transfers and re-links all file types: images (JPG, PNG, GIF, WebP), PDFs, ZIP archives, spreadsheets, audio, and video. Featured images and Media Library metadata (title, alt text, caption, and description) are included.
- Pro Plan: Everything Free covers, plus rewriting file links inside serialized page-builder layouts (Beaver Builder, Elementor, Divi, etc.) so referenced media keeps resolving on the destination.
Alt text gets extra treatment beyond simple metadata transfer. Migro also reconciles the inline alt="" baked into post HTML against each image's Media Library value, and can generate missing alts with AI. See Alt Text Sync below.
Alt Text Sync Accessibility
WordPress stores image alt text in two independent places: the attachment's Media Library meta (_wp_attachment_image_alt) and the inline alt="" attribute baked into post HTML when the image was first inserted. After insertion, the two never sync. Update an image's alt in the Media Library and every existing post still renders the stale baked-in value to screen readers, a silent accessibility regression.
Alt Text Sync fixes this during every migration. Available on all plans (free and Pro), it rewrites inline alt attributes on Classic editor and Gutenberg core/image blocks so the migrated post matches the current Media Library value. Page-builder serialized data (Beaver Builder, Elementor, Divi) is left alone on purpose: those builders render alt from attachment meta at runtime, so rewriting their JSON would do nothing useful and could corrupt layouts.
How it runs
Alt Text Sync runs on every migration, pulls and pushes alike, and only after the AI alt-text generator finishes, so any freshly generated alt is included in the reconciliation. Here's what happens for each post:
- The image is migrated to the destination and any alt text (including AI-generated values) is written to the Media Library.
- Alt Text Sync scans the post's HTML, locates each image, reads the matching Media Library alt, and rewrites the inline
alt=""to match. - The post is saved with the reconciled HTML, so what the page renders to screen readers matches what's stored on the attachment.
Conflict behavior
Go to Migro → Settings. The Alt Text Sync: On Conflict setting controls what happens when inline alt already has a value:
- Skip (default): Keep the existing inline alt. Only fill empty alts from the Media Library. Safest choice for sites with hand-curated alt text.
- Overwrite: Always rewrite inline alt to match the Media Library value, even if a value is already present. Use this when the Media Library is your source of truth (e.g. you've bulk-generated alts with AI and want them everywhere).
Empty alts are always filled from the Media Library regardless of this setting. That is the core accessibility win and there is no reason to skip it.
Pairs perfectly with AI Alt Text
Enable both AI Image Alt Text Generation (below) and Alt Text Sync on Overwrite, and a single migration will: generate missing alts with AI, write them to the Media Library, and propagate them into every post's inline HTML, all in one pass.
Backups & Restore
When you enable Create Backup in the migration options, Migro saves a snapshot of any content that is about to be overwritten. These snapshots let you undo a migration if something went wrong.
Viewing backups
Go to Migro → Backups. Each backup shows the post title and type, the date and time it was created, and which migration created it.
Restoring a backup
Click Restore next to any backup to roll that item back to the saved version. The current version is overwritten with the backup.
Deleting backups
Click Delete to remove a backup you no longer need. Backups older than 30 days are cleaned up automatically.
Logs
Every migration is recorded. Go to Migro → Logs to see the full history. Each log entry shows:
- The post title and type
- The migration direction (Pull or Push)
- The result: Success, Skipped, or Error
- A timestamp
- Any error message if the migration failed
Logs are kept for 30 days by default. You can change the retention period in Migro → Settings → Logs.
AI Enhancements v2.4+
Migro 2.4 introduces AI-driven enhancements that fill in missing accessibility and SEO metadata during a migration, so you don't have to backfill it manually after the fact. The AI features piggyback on WordPress 7.0's built-in AI Client: meaning Migro never stores your API keys, never asks for them, and never bills you for tokens. You bring your own provider (Anthropic, Google, OpenAI, or any third-party plugin that registers an ai_provider connector), and Migro just calls through it.
What's included
- AI Image Alt Text Generation: Available on all plans (free + Pro). Generates alt text for images that are missing it, both during pull and during push.
- AI Yoast SEO Title & Meta Description: Pro-only. Fills the Yoast meta title and meta description fields when they are blank.
- Per-Feature Provider Picker: Available on all plans. When you have two or more providers configured, you can route each feature to a specific one (e.g. Anthropic for vision, OpenAI for SEO copy).
Why "bring your own provider"?
WordPress 7.0 ships a first-party AI Client and a connector registry under Settings → Connectors. Provider plugins (e.g. "AI Provider for Anthropic", "AI Provider for Google") register themselves there and hold the API key in WordPress options, environment variables, or PHP constants. Migro reads that registry and calls through it, so the same provider you configured for any other AI-aware plugin works automatically for Migro, and revoking the key in one place revokes it everywhere.
Connect a Provider
Before any AI feature will run, you need WordPress 7.0+ and at least one AI provider plugin with credentials configured.
Update to WordPress 7.0 or higher
The AI Client (wp_ai_client_prompt()) and connector registry (wp_get_connectors()) are core APIs introduced in WordPress 7.0. On older versions the AI Enhancements tab will tell you what's missing and the feature toggles will refuse to save as enabled.
Install an AI provider plugin
Install one of the first-party AI provider plugins from WordPress.org, for example AI Provider for Anthropic, AI Provider for Google, or AI Provider for OpenAI. Any plugin that registers an ai_provider connector works; you are not locked to a specific vendor.
Enter your API key under Settings → Connectors
Go to WordPress Admin → Settings → Connectors, find your provider, and paste in your API key. You can also supply the key via an environment variable or PHP constant if your hosting locks the options table down; Migro detects all three sources.
Open Migro → AI Enhancements
You'll see a green banner naming the configured provider (or listing all configured providers if you have more than one). If you see a yellow banner saying "AI Client detected — no provider connected", revisit step 3.
You pay your provider directly
Migro does not proxy AI requests or mark up token usage. Your provider bills you according to their own pricing for each generation. Use the Cache TTL setting (described below) to avoid paying for the same generation twice.
AI Image Alt Text Generation
Available on all plans. Generates descriptive, accessibility-grade alt text for images that don't have any, using a vision-capable AI provider. Existing alt text is never overwritten. This feature only fills the blanks.
Enabling it
- Go to Migro → AI Enhancements.
- Tick Generate alt text for images that are missing it.
- If you have multiple providers configured, choose which one to use for alt text (defaults to the SDK's pick).
- Click Save Changes.
What it scans
The generator runs on both pull and push migrations. For each migrated post it inspects:
- Inline images in post_content: both the Gutenberg
core/imageblock (wp-image-{ID}class hook) and Classic editor markup. - Attached media: any attachment whose
post_parentmatches the migrated post. This is how page-builder layouts (Beaver Builder, Elementor, Divi) get covered. Their images live as attached media even when not present inpost_content.
For each image with no alt, Migro sends the image (as base64) plus the post title/excerpt as context to the configured provider, gets a concise description back, sanitizes and truncates it, and writes it to _wp_attachment_image_alt. On push, the generated alt is also written to the remote attachment's postmeta via the migration's PDO connection, mapping local attachments to remote via the _migro_hash sync key.
Combine with Alt Text Sync for the full pipeline
The AI generator writes alt to Media Library meta. The Alt Text Sync feature (priority 20, runs immediately after) then writes that same alt into the post's inline HTML. Enable both and a single migration generates alt text for every missing image AND propagates it into every post that uses that image.
Vision-capable providers
Alt text generation needs a provider whose model can accept an image as input. Anthropic Claude (Haiku/Sonnet/Opus 3+), Google Gemini, and OpenAI GPT-4o-class models all support this. If your selected provider can't accept images, the generation call will fail gracefully and the original (empty) alt will remain. Migro never crashes a migration over an AI failure.
AI Yoast SEO Meta Pro
Pro-only. Generates a Yoast SEO title and meta description for posts where those Yoast fields are empty, using the post title, excerpt, and content as context. Runs on pull migrations only. It's designed for the "I just pulled production into staging and now I want SEO meta for everything I haven't filled in yet" workflow.
Enabling it
- Make sure Yoast SEO is installed and active on this site.
- Go to Migro → AI Enhancements.
- Tick Generate Yoast title & meta description for posts missing them.
- If you have multiple providers configured, pick the one to use for Yoast meta (often a fast text model like Claude Haiku or GPT-4o-mini is plenty here).
- Click Save Changes.
Yoast Premium AI takes priority
If Yoast SEO Premium is active and its own AI generator is present, Migro automatically skips its Yoast meta generation to avoid two layers writing to the same fields. The toggle in the AI Enhancements tab will be disabled with a note explaining why. Use Yoast Premium's AI features through Yoast's UI in that case.
What gets generated
- SEO title: A keyword-aware page title formatted for SERPs. Written to the
_yoast_wpseo_titlepostmeta. - Meta description: A 140-155 character summary appropriate for search snippets. Written to
_yoast_wpseo_metadescpostmeta.
Both fields are only filled when empty. If you have already written a SEO title or description in Yoast, Migro will not touch it.
Per-Feature Provider Picker
The AI Enhancements tab adapts to how many providers you have configured:
- Zero providers: A yellow banner tells you to connect a provider under Settings → Connectors. Feature toggles will not save as enabled.
- One provider: A green banner names the provider (e.g. "Provider: Anthropic"). All AI features route through it. No picker is shown.
- Two or more providers: Each enabled feature gets its own radio group letting you pick the provider for that specific task.
Typical multi-provider setups
- Anthropic for vision, OpenAI for copy: Route AI Image Alt Text through Claude (excellent at vision + accessibility tone) and AI Yoast Meta through GPT-4o-mini (cheaper, fast SERP-style writing).
- Google for everything: Gemini 2.5 handles both vision and text well, and is often the cheapest option in token costs. Configure only the Google connector and skip the picker entirely.
- Cost vs. quality A/B: Configure two providers and flip between them in the picker to compare generation quality on the same content before committing to one.
The picker is purely about routing. Both providers receive the same prompt structure; only the model behind the call changes. If you select a provider and later remove its API key, Migro detects that the selection is no longer valid and falls back to letting the SDK pick a default; your migrations never break because of a stale provider selection.
Cost & Caching
AI generation is the only part of Migro that costs money per use (you pay your provider, not Migro). Two settings exist to keep that cost predictable.
Result cache
Migro caches every AI response keyed by the input that produced it (e.g. for alt text, by the image hash + post title context). If the same migration is re-run within the cache window, the cached value is reused and no provider call is made. This matters most for retries: if a network blip causes you to click Retry All Failed, the AI calls from the first attempt don't get re-billed.
- Cache TTL (days): How long AI responses are reused before the cache expires. Default: 30 days. Set higher if your content rarely changes; lower if you want fresher generations.
Estimating cost before you turn it on
Rule of thumb per call, at provider list prices as of 2026:
- Image alt text: ~$0.001–$0.003 per image with Claude Haiku or Gemini Flash; ~$0.01–$0.03 with Claude Sonnet/Opus or GPT-4o. Multiply by the number of images currently missing alt text across your migration set.
- Yoast meta: ~$0.0005–$0.002 per post with a small model; the prompt is short and the output is two short strings.
For a 500-post migration with 1,500 missing alts, expect $1.50–$5 on a budget model and $15–$50 on a flagship model. Run a small batch first to calibrate against your actual content and provider.
Testing without spending money
Developers extending Migro can use the migro_ai_mock_generate_alt and migro_ai_mock_generate_yoast filters to inject mock responses during tests. The unit test suite uses these to exercise the whole pipeline without ever calling a real provider.
Pro Features Pro
The free version covers unlimited standard post/page migrations with images, taxonomies, and a full backup & restore workflow. Pro unlocks the complete developer toolkit: custom post types, ACF, Yoast SEO, WooCommerce, page builders, scheduled migrations, WP-CLI, and AI Yoast meta generation.
ACF & Yoast SEO
Pro includes full bridging of Advanced Custom Fields and Yoast SEO data. Migro scans for ACF relationship fields, galleries, repeater arrays, and all Yoast metadata options (focus keyword, title, indexing rules) and mirrors them accurately across environments.
Taxonomies & Custom Post Types
In addition to standard categories and tags, Migro Pro bridges Custom Post Types and Custom Taxonomies natively. It evaluates parent-child taxonomy trees to ensure category relationships never break during migration.
Quick Migrate
Quick Migrate adds a one-click migration link directly to your post and page lists. Hover over any item in your list table and click Push to Production (or Pull from Staging, depending on your environment) to deploy that single item with your default settings, without opening the full migration interface.
Gutenberg Sidebar Integration
When editing a post in the Gutenberg block editor, a custom Migro Sidebar Panel appears in the right sidebar. You can trigger a migration directly from the sidebar without leaving your writing flow. The migration button label dynamically reflects the correct environment direction (e.g. "Push to Production" or "Pull from Staging") based on the current site's configured role.
Confirmation before every migration
Quick Migrate shows a confirmation modal before any migration starts, displaying the target site, direction, and whether this is a new item or an overwrite. This prevents accidental production deploys.

Page Builder Support
When migrating content built with a page builder, layout styles need to be regenerated on the destination site. Migro handles this automatically after each migration, with no configuration needed. It detects which builders are active and triggers the right cache rebuild for each.
- Elementor: Regenerates the Elementor CSS cache for migrated posts
- Divi: Triggers a Divi CSS rebuild
- Beaver Builder: Refreshes the builder cache
- WPBakery: Updates shortcode rendering
- Oxygen Builder: Regenerates CSS assets
- Bricks Builder: Regenerates builder assets
- Thrive Architect: Triggers content regeneration
WooCommerce Migration Pro
Migro Pro ships full WooCommerce product migration as a dedicated engine, not a generic CPT pass-through. It understands product variations, downloadable files, tax/shipping classes, attribute taxonomies, and the relationship meta that ties grouped/upsell/cross-sell products together. Migrate a single product or your entire catalog with the same workflow you use for posts and pages.
What gets migrated
- Simple, grouped, external, and variable products: All product types including their full set of variations.
- Pricing, stock, and inventory: Regular price, sale price, sale schedule, stock quantity, backorder rules, and per-variation stock are preserved verbatim. (See the "Variation stock preservation" note below.)
- Product images and galleries: Featured image plus the gallery, deduplicated by hash like every other Migro media transfer.
- Downloadable products: File URLs are automatically rewritten to point at the destination's
wp-content/uploads/base so downloads work immediately on the target site. - Attribute taxonomies: Global attributes (the
pa_*taxonomies) are bootstrapped on the destination if missing, then assigned to the migrated product. - Tax & shipping classes: Auto-created on the destination when they don't exist, so a product never lands with an orphaned class reference.
- Related products: Grouped product children, upsells, and cross-sells are automatically queued and migrated before their parent, so relationship meta points at real destination IDs (not orphaned local ones).
Related-product auto-prepend
WooCommerce stores upsells, cross-sells, and grouped product children as arrays of post IDs on the parent product. If you migrate the parent without those children, the meta on the destination points at IDs that don't exist (or worse, exist but reference unrelated content). Migro detects related product references during the resolve phase and inserts them at the front of the migration queue so they migrate first, then translates the parent's relationship arrays to the destination's IDs before saving.
Orphan variation cleanup
When you edit a variable product on the source site and delete some variations, those deleted variations stick around as orphans on the destination after a migration unless you tell Migro to clean them up. The Delete orphan variations option (admin checkbox + --delete-orphan-variations CLI flag) removes any variation on the destination that no longer has a matching parent variation on the source. Opt in when you want strict source-of-truth syncing; leave it off when you want to preserve historical variations.
Variation stock preservation
A common bug in naive WooCommerce sync tools is wiping variation stock when the parent product is updated. Migro's engine reads each variation's stock state before the parent write and replays it after, so a push that updates a product description doesn't accidentally zero out variation inventory on production.
Skipping WooCommerce attribute taxonomies in CPT registration
Migro's CPT auto-registration intentionally skips the pa_* attribute taxonomies. WooCommerce manages these through its own UI, and registering them generically would cause duplicate admin menus and layout issues on the destination. They are still migrated as taxonomy terms, not re-registered as standalone taxonomies.
Migrating products from the CLI
WooCommerce products are just another post type to wp migro: pass --type=product. The orphan-variation flag becomes --delete-orphan-variations. Example: wp migro push --type=product --all --delete-orphan-variations --yes --user=admin.
Scheduled Migrations Pro
With Migro Pro you can save a push or pull and have it run automatically (every hour, twice a day, daily, or weekly) in the background, through the same engine as a manual migration. Set up a nightly content sync from staging to production once and leave it running.
Why teams use it
Keep a content-staging site continuously mirrored to production, ship editorial batches overnight to avoid peak traffic, or guarantee a recurring one-way sync without anyone remembering to click a button. Every scheduled run takes a pre-migration backup by default, the same safety net as a manual run.
Creating a schedule
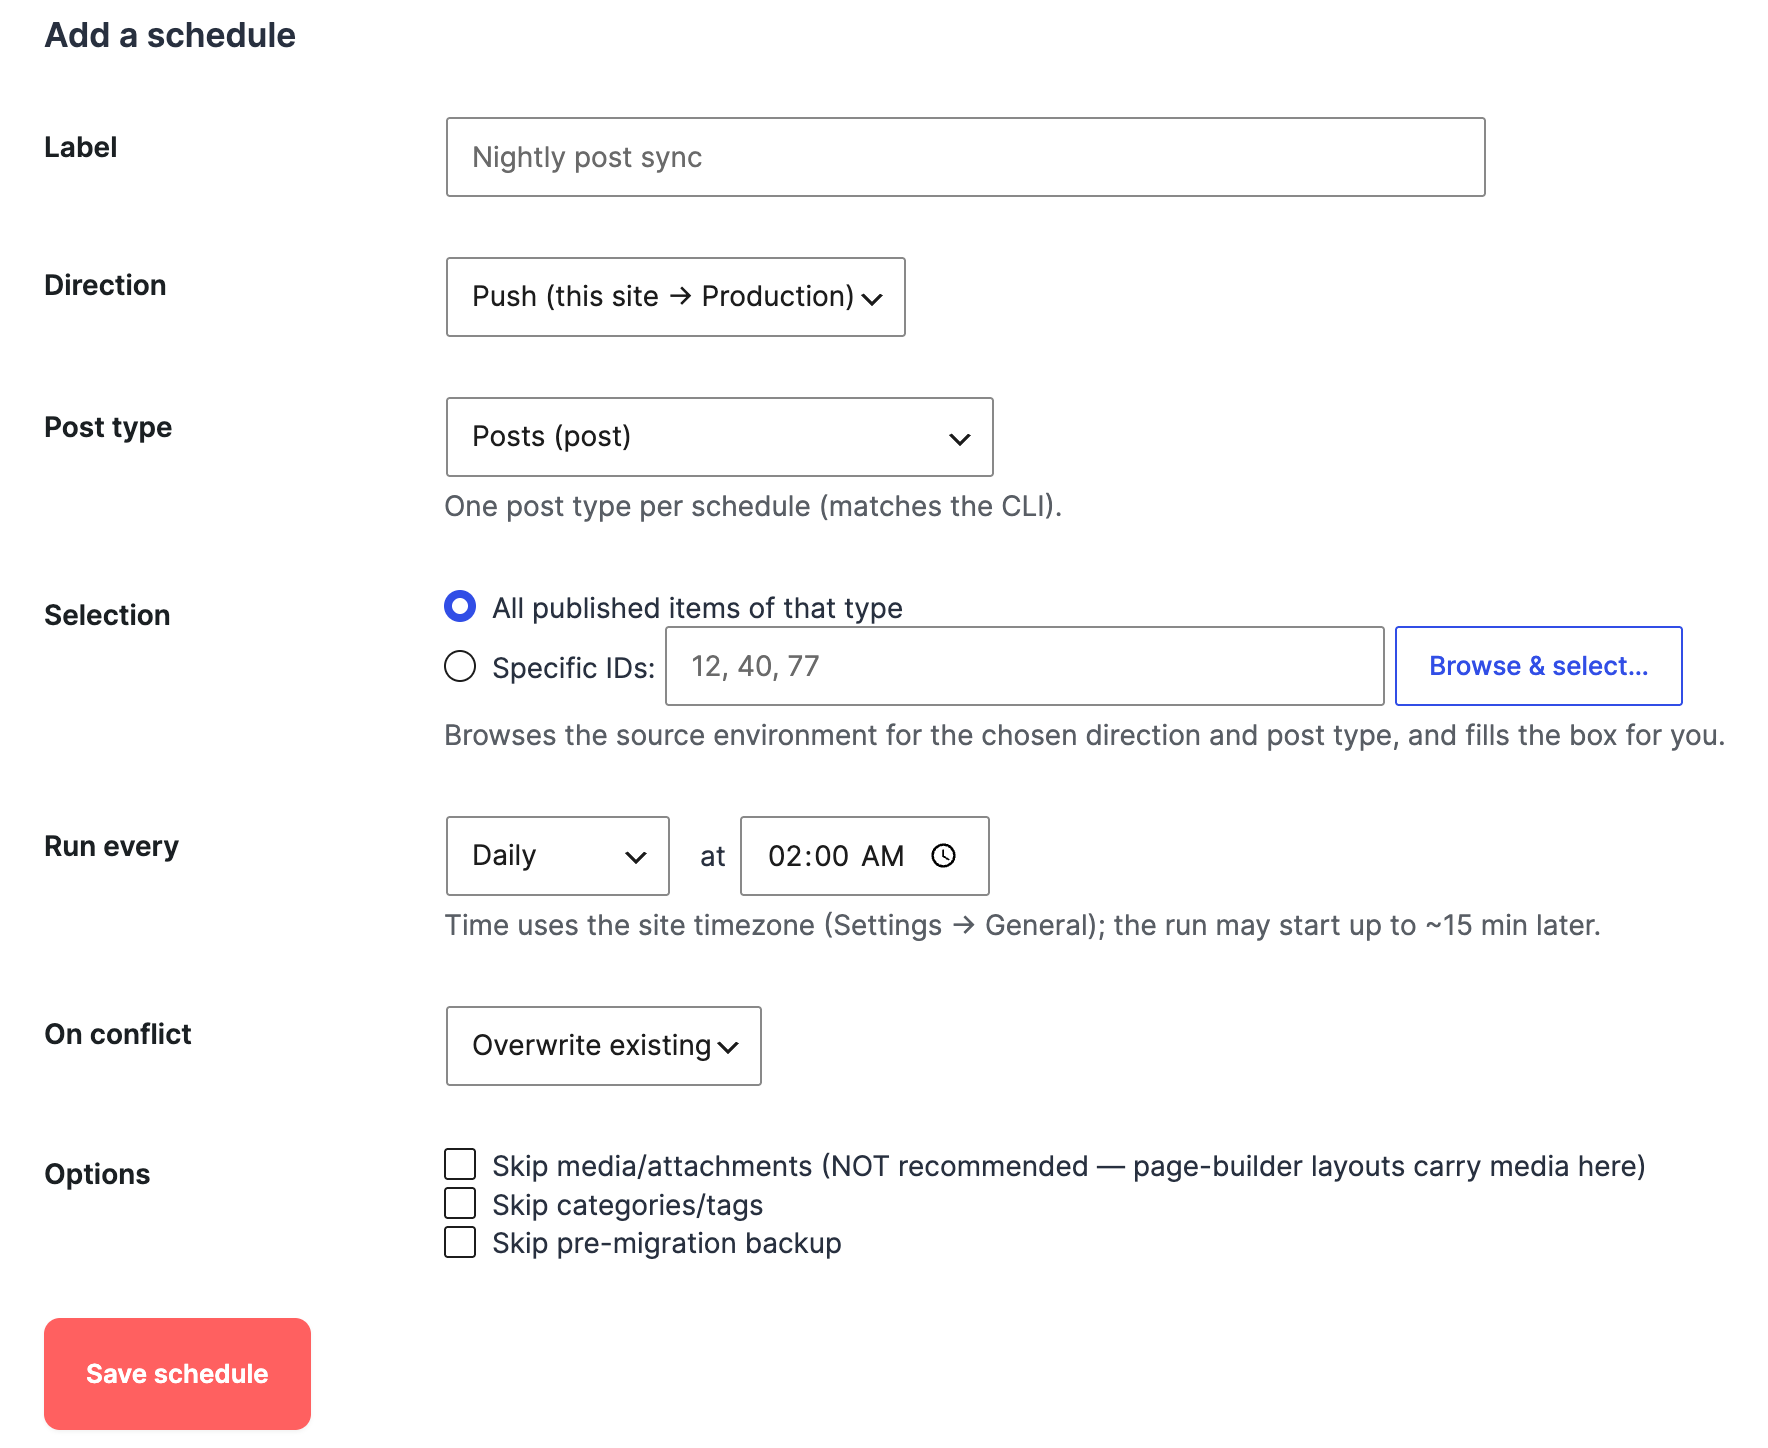
Go to Migro → Schedules. Fill in the form and click Save schedule:
- Label: A friendly name so you can recognize it later (e.g. Nightly post sync).
- Direction: Push (this site → paired site) or Pull (paired site → this site).
- Post type: One post type per schedule.
- Selection: All published items of that type, or a specific list of IDs. Use Browse & select… to pick items visually from the source environment.
- Run every: Hourly, twice daily, daily, or weekly, with the exact time(s)/weekday in your site's timezone.
- On conflict: Overwrite existing items or skip them.
- Options: Optionally skip media, skip taxonomies, or skip the pre-migration backup (not recommended).

Managing schedules
The table at the top of the Schedules tab lists every saved schedule with its direction, what it migrates, cadence, next run time, last result, and status. Each row has actions:
- Run now: Execute the schedule immediately, regardless of its next due time or enabled state. Great for testing.
- Enable / Disable: Pause a schedule without deleting it. Disabled schedules are skipped by the scheduler.
- Delete: Remove the schedule permanently.
The Last result column shows the outcome of the most recent run and when it ran, in your site's timezone and language.
Schedules rely on WordPress cron
The scheduler checks for due jobs roughly every 15 minutes via WP-Cron, so a run can start up to ~15 minutes after its scheduled time. Low-traffic sites should trigger WP-Cron from a real system cron for reliable timing; see the WP-CLI section below for a robust setup. Each scheduled run executes as its owner and re-checks that the owner still has permission to migrate.
WP-CLI Commands Pro
Migro Pro registers a full wp migro command namespace so you can run migrations and manage schedules from the terminal, CI pipelines, deploy scripts, and system cron. The WP-CLI surface is Pro-only and is available automatically wherever WP-CLI and Migro Pro are both installed.
Capability model: run as a real user
CLI commands enforce the same capabilities as the admin UI, checked against the user you pass with --user=. Running a migration requires a user who can migrate content (administrator or editor); creating, editing, or deleting schedules requires an administrator. Always pass --user=<admin> in cron and CI so jobs run least-privilege and never as an anonymous context.
Inspecting the connection
wp migro status prints the current environment, the paired site, and connection health. wp migro connections list lists configured connections.
# Show environment + paired-site health
wp migro status --user=admin

# List configured connections
wp migro connections list --user=admin

# Machine-readable output
wp migro connections list --format=json --user=admin
Running a migration
wp migro push deploys from this site to the paired site; wp migro pull brings content the other way. Both take the same options. Defaults intentionally mirror the admin UI: media, taxonomies, and a pre-migration backup are all on unless you explicitly opt out.
| Flag | Description |
|---|---|
--type=<types> | Comma-separated post types (e.g. post,page,product). Required unless --ids carries its own single type. |
--ids=<ids> | Comma-separated post IDs. Mutually exclusive with --all; requires exactly one --type. |
--all | Every published item of the given --type(s). Requires --type. |
--conflict=<mode> | overwrite (default) or skip items that already exist on the destination. |
--skip-media | Do NOT migrate media/attachments. Migrated by default; skipping breaks page-builder media (Beaver Builder, Elementor, Divi). |
--skip-taxonomies | Do NOT migrate categories/tags. Migrated by default. |
--skip-backup | Do NOT take a pre-migration backup. Taken by default; if a requested backup fails the migration aborts. |
--dry-run | Resolve and print the item set + target connection without calling the engine. Exit 0. |
--yes | Skip the interactive confirmation. Required for cron / non-interactive use. |
--connection=<id> | Forward-compatible with multi-connection support; currently only the active paired connection is valid. |
# Preview what a full post sync would move — touches nothing
wp migro push --type=post --all --dry-run --user=admin

# Push every published post and page to production (non-interactive)
wp migro push --type=post,page --all --yes --user=admin

# Push three specific posts, skipping items that already exist
wp migro push --type=post --ids=12,40,77 --conflict=skip --yes --user=admin

# Pull all products from production into staging
wp migro pull --type=product --all --yes --user=admin

# Push pages but don't take a backup first (faster, less safe)
wp migro push --type=page --all --skip-backup --yes --user=admin
The command exits 0 on success and 1 on failure, so CI pipelines and deploy scripts can branch on the result.

Managing schedules from the CLI
Everything the Schedules tab does is available as wp migro schedule <subcommand>: handy for provisioning environments from a script or version-controlling your deployment cadence.
| Subcommand | Description |
|---|---|
schedule list | List saved schedules. Supports --format=table|json|csv|yaml. |
schedule add | Create a schedule. Requires --direction and --type. |
schedule remove <id> | Delete a schedule by id. |
schedule enable <id> | Enable a disabled schedule. |
schedule disable <id> | Pause a schedule without deleting it. |
schedule run <id> | Run a schedule now, ignoring its due time and enabled state. |
schedule add accepts: --direction=push|pull (required), --type=<type> (required, single type), --ids=<ids> (omit for all published), --recurrence=hourly|twicedaily|daily|weekly (default daily), --label=<label>, --conflict=overwrite|skip (default overwrite), --skip-media, --skip-taxonomies, --skip-backup, and --disabled (create it paused).
# Create a daily push of all posts at the default cadence
wp migro schedule add --direction=push --type=post --label="Nightly posts" --user=admin

# Weekly pull of products, skipping conflicts
wp migro schedule add --direction=pull --type=product --recurrence=weekly --conflict=skip --user=admin

# List schedules as a table
wp migro schedule list --user=admin

# Run one immediately to test it
wp migro schedule run sch_a1b2c3d4e5f6 --user=admin

# Pause / resume / delete
wp migro schedule disable sch_a1b2c3d4e5f6 --user=admin
wp migro schedule enable  sch_a1b2c3d4e5f6 --user=admin
wp migro schedule remove  sch_a1b2c3d4e5f6 --user=admin
Reliable scheduling with system cron
On low-traffic sites WordPress's pseudo-cron only fires when someone visits the site, which makes scheduled migrations run late or not at all. The robust setup is to disable WP pseudo-cron and drive it from a real system crontab.
define( 'DISABLE_WP_CRON', true );# Fire all due WordPress cron events (incl. Migro schedules) every 5 min
*/5 * * * * cd /var/www/site && wp cron event run --due-now --user=admin >/dev/null 2>&1
# Or skip the scheduler entirely and run a migration directly each night
0 2 * * * cd /var/www/site && wp migro push --type=post,page --all --yes --user=admin >> /var/log/migro.log 2>&1Two valid patterns
Either let the WordPress cron runner drive your saved Schedules (UI-managed, visible in the Schedules tab), or call wp migro push/pull directly from cron for a scriptable, log-everything approach. Both run the identical migration engine; pick whichever fits how your team operates.
What Gets Migrated
Free version (all plans)
- Post title, slug, content, and excerpt
- Post status (published, draft, scheduled)
- Post date and modified date
- Author attribution
- Featured image
- All media files referenced in the post: images (JPG, PNG, GIF, WebP), PDFs, ZIP archives, spreadsheets, audio, and video
- Post meta (all key-value pairs)
- Categories and tags (with full hierarchy)
- Parent-child relationships for hierarchical post types
- Comment status and ping status
- Alt Text Sync: Reconciles inline alt with Media Library on every migration
- AI Image Alt Text: Optional. Fills missing alts using your configured AI provider (WP 7.0+)
Pro adds
- Custom Post Types: Any registered CPT, including portfolio items, events, and anything else
- Advanced Custom Fields: All ACF Free and ACF Pro field types: repeaters, flexible content, image fields, gallery fields, and relationship fields
- Yoast SEO: Meta titles, meta descriptions, focus keywords, canonical URLs, OpenGraph data, Twitter Card data, and schema markup
- AI Yoast SEO Meta: Optional. Generates missing Yoast title + meta description using your configured AI provider
- WooCommerce Products: Simple/grouped/external/variable products with pricing, SKU, stock (per-variation), weight, dimensions, images and galleries, attribute taxonomies, tax/shipping classes, downloadable file URL rewrites, and auto-prepended related products (children, upsells, cross-sells)
- Custom Taxonomies: Any taxonomy registered by themes or plugins
- Page Builder CSS: Auto-regenerated on the destination after each migration
Settings Reference
Go to Migro → Settings. All settings are visible to site admins only.
General Settings
- This Environment Is: Staging or Production. Tells Migro what role this site plays and controls push/pull button labels throughout the plugin.
- Batch Size: How many items to process at once. Lower values are safer for large content or slow connections. Default: 10.
- Timeout (seconds): How long to wait for a remote response before the request fails. Increase this for slow or high-latency connections. Default: 300.
- Synchronized Logging: When enabled, migration logs are written to both the local and remote site, so you can see the full activity history from either environment.
- Log Retention (days): How long migration logs are kept before automatic cleanup. Default: 90 days.
Quick Migrate Settings
- Conflict Resolution: What happens when a Quick Migrate item already exists on the destination. Skip leaves the existing item untouched; Overwrite replaces it. Default: Overwrite.
Alt Text Sync
- If inline alt text already exists: Controls what happens when a post's inline
alt=""already has a value. Skip keeps the existing inline alt; Overwrite replaces it with the current Media Library value. Empty alts are always filled regardless of this setting. Default: Skip.
Configure Your Migration Pipeline
- Current Paired Environment: Shows the URL and last-tested timestamp of the site this installation is connected to. Use Delete connection to unpair the sites.
- Update Connection: Opens the connection form to change the remote site URL, database credentials, or Application Password without running the full Setup Wizard again.
Security & Performance
Migro includes several security and performance safeguards built into the core migration engine.
1. Rate Limiting Safeguards
To protect both staging and production environments from server resource exhaustion, denial-of-service (DoS) states, or brute force attacks, Migro enforces strict transient-based rate limits on key administrative actions:
- Connection Testing: Limited to 5 attempts per minute. If this threshold is exceeded, subsequent attempts are blocked for 60 seconds with a descriptive error.
- Migration Triggers: Limited to 10 requests per hour to prevent high-frequency server-to-server load spikes.
2. Native Stored Password Encryption (libsodium)
Migro guarantees that no remote credentials (database passwords, API passwords, or licensing secrets) are ever written in plaintext or simple reversible formats (like base64) to the database.
On environments supporting libsodium (PHP 7.2+ native extension), Migro automatically uses high-security authenticated encryption (AEAD) with unique key generation. If libsodium is missing, it falls back gracefully but securely. If WordPress salts are rotated in wp-config.php and stored secrets can no longer be decrypted, Migro surfaces a helpful alert instructing the admin to re-enter credentials.
3. Privacy-Compliant Opt-In Telemetry
Starting in version 2.2.8, Migro features a completely anonymized, privacy-compliant heartbeat tracking system to help us improve the plugin's speed and compatibility.
This tracking is 100% opt-in. When you consent, Migro transmits a weekly payload to migro.dev, rate-limited to 10 attempts per hour. The data is fully aggregated and includes:
- Active PHP version and WordPress version
- Current website language locale
- License category (Free or Pro)
- Anonymized migration metrics (direction and bulk item counts)
Troubleshooting
Connection issues
- Database connection failed: Re-verify your database host, username, password, and port. Ensure your database server's firewall allows remote connections from your local/staging IP.
- REST API connection failed: Confirm the Site URL includes
https://orhttp://. Application passwords require WordPress 5.6+ with SSL enabled on standard setups.
Migration issues
- Images not migrating: Ensure the source site is accessible via public HTTP and the target site's
wp-content/uploads/directory has write permissions (755). - Missing content blocks: Use Overwrite (not Skip) for existing articles to ensure content is updated.
Debug Mode
To enable granular logging, add the following to your wp-config.php:
define('WP_DEBUG', true);
define('WP_DEBUG_LOG', true);
define('WP_DEBUG_DISPLAY', false);
Check /wp-content/debug.log for API calls and database SQL execution from Migro.
Still stuck?
Email us at support@migro.dev with your debug log attached. Pro users get priority response.
FAQ
Do I need to install Migro on both sites?
Yes. Migro needs to be active on both the staging and production site.
Does Migro work with multisite?
Migro is designed for single-site installations. Multisite support is not currently available.
What happens to images that already exist on the destination?
Migro uses MD5 hashing to detect duplicate images. If an identical image is already in the destination's Media Library, Migro links to the existing attachment instead of uploading a copy.
Can I migrate from production to staging?
Yes. Pull and Push work in both directions. You can pull content from production into staging just as easily as pushing from staging to production.
Will migrating a post update its URL on the destination?
Migro preserves the original slug. The URL on the destination will match the URL on the source site, unless the permalink structure differs between environments.
Does Migro migrate users?
No. User accounts are not migrated. If a post author does not exist on the destination, the post is assigned to the admin who ran the migration.
Is my database password stored securely?
Database passwords are encrypted before being saved to the WordPress options table. They are never stored or transmitted in plain text.
What if the migration fails halfway through?
Each item is migrated independently. If one item fails, the others continue. The live dashboard shows a Retry button on any failed item so you can re-run just that one without restarting the whole batch. The Logs page also shows exactly which items succeeded, which were skipped, and which failed with an error message.
Does Migro handle WooCommerce product variations?
Yes, with Pro. Products, variations, pricing, stock, galleries, related products, and downloadable file URLs all migrate together. See WooCommerce Migration for the full detail.
Can I use Migro with a staging environment on a different server?
Yes, as long as you have the remote site's database credentials and can create an Application Password on that site.
Does Migro store my AI provider's API key?
No. AI features use WordPress 7.0's built-in AI Client and connector registry. You connect a provider once under Settings → Connectors (Anthropic, Google, OpenAI, or any third-party) and Migro just calls through it. Keys never touch Migro's options table or any migro.dev server. Revoke a key in Settings → Connectors and the AI features stop working everywhere immediately.
Do I need WordPress 7.0 to use Migro?
No. The whole migration engine, including Alt Text Sync, runs fine on WordPress 5.6+. WordPress 7.0+ is only required if you want to use the AI Enhancements tab. Without it, the tab is simply hidden.
Will AI features overwrite alt text or SEO meta I've already written?
No. Both the AI alt text generator and the AI Yoast meta generator only fill empty fields. Anything you've written by hand is preserved. The only feature that can overwrite existing inline alt is Alt Text Sync, and only when you explicitly set it to Overwrite.
How much will AI generation cost me?
You pay your provider directly; Migro does not mark up tokens. As a rough guide, a 500-post migration with 1,500 missing alts is typically $1.50–$5 on a budget vision model (Claude Haiku, Gemini Flash) and $15–$50 on a flagship model (Claude Sonnet/Opus, GPT-4o). The 30-day result cache means re-running the same migration costs nothing extra.
What if my provider's vision model can't read an image?
The AI call fails gracefully and the original empty alt is left alone. The migration itself continues without error. Migro never aborts a migration because of an AI failure. Pick a vision-capable model (Claude Haiku/Sonnet/Opus, Gemini Flash/Pro, GPT-4o-class) and this should be rare.
Question not answered?
Email us at support@migro.dev. Pro users get priority response.